Deck Holiday Lighting Guide for Ontario
Complete guide to deck holiday lighting in Ontario. Safety codes, power options, weather protection, and installation tips for Canadian winters.
Your deck doesn't have to go dark just because temperatures drop. Holiday lighting transforms outdoor spaces into festive gathering spots—but Ontario's freeze-thaw cycles, snow loads, and electrical codes require a different approach than simply stringing up lights and hoping for the best.
Here's what works, what's legal, and how to avoid a January service call.
Power Source Options for Deck Holiday Lighting
You have three main choices for powering lights on your deck. Each has trade-offs for safety, cost, and convenience.
🏗️ Planning a deck project?
Get a free manual project review, or visualize your dream deck with AI before requesting quotes.
Low-Voltage Systems (12V or 24V)
Low-voltage systems run through a transformer that plugs into a standard outdoor outlet. The transformer reduces 120V household current down to 12V or 24V.
Benefits:
- No permit required in most KWC municipalities for low-voltage installations
- Safer to work with—reduced shock risk
- Can leave installed year-round if you use weatherproof fixtures
- Lower operating costs than line-voltage systems
Limitations:
- Maximum run length typically 50-100 feet before voltage drop affects brightness
- Transformer must be rated for outdoor use and protected from snow accumulation
- Initial cost: $150-400 for a quality transformer and wire setup
Low-voltage is the most practical choice for most deck lighting projects. You can tie into an existing low-voltage landscape lighting system if you already have one.
Line-Voltage Systems (120V)
Standard household voltage requires a dedicated outdoor circuit with GFCI protection. This means hardwired installation by a licensed electrician.
Benefits:
- No brightness loss over long runs
- Can power higher-wattage displays
- Permanent installation suitable for year-round deck lighting
Requirements:
- ESA (Electrical Safety Authority) permit required in Ontario
- Licensed electrician must install and connect to your panel
- GFCI-protected outdoor outlet or hardwired connection
- Cost: $800-2,000+ for professional installation
Only go this route if you're planning permanent deck lighting that serves double duty during holidays. The permit and labour costs don't make sense for temporary seasonal displays.
Battery-Powered Options
Battery-powered LED strings work for small accent areas but aren't practical for full deck lighting.
Reality check:
- Most battery packs last 4-8 hours per charge in cold weather
- Lithium batteries perform better than alkaline in freezing temperatures, but still lose 20-30% capacity below 0°C
- You'll be recharging or replacing batteries constantly through December and January
Use battery lights for wreaths, planters, or small decorative touches—not as your primary deck illumination.
Ontario Electrical Code Requirements
Even temporary holiday lighting must meet basic safety standards. Here's what the Ontario Electrical Safety Code (OESC) requires:
Outdoor outlets must have:
- GFCI protection (ground fault circuit interrupter)
- Weather-resistant covers rated for "in-use" (covers that close over plugs)
- Proper grounding
Extension cords must be:
- Rated for outdoor use (look for "W" in the rating: SJTW, SJTOW)
- Sized appropriately for the load (typically 14 AWG or 12 AWG for lighting)
- Protected from physical damage (don't run under railings where they can be pinched)
Lighting products must:
- Be CSA or cCSA certified (Canadian standards)
- Have intact weatherproof housings
- Use proper bulb wattages (don't exceed fixture ratings)
Cord management:
- Don't daisy-chain more than 3 extension cords
- Keep connections off the ground where they can sit in meltwater
- Use outdoor-rated cord clips or guides—never staples or nails through the cord jacket
If your deck doesn't have an outdoor outlet, you'll need one installed before running holiday lights. A licensed electrician can add a GFCI outlet to an existing exterior wall circuit for $300-600 in the KWC area — a minor addition relative to what decks cost to build in Ontario. This is a permit-required job.
Weather Protection for Ontario Winters
Holiday lights designed for California don't survive KWC winters. You need equipment rated for Canadian conditions.
Temperature Ratings
Check the product specs for operating temperature range. Quality outdoor lights are rated to -35°C or lower. Cheaper imported strings often fail below -10°C when wire insulation becomes brittle.
LED lights handle cold better than incandescent. LEDs generate minimal heat, which means less thermal stress during freeze-thaw cycles. Incandescent bulbs generate heat that melts snow, then ice forms when the lights are off—accelerating fixture corrosion.
Moisture Protection
IP (Ingress Protection) ratings tell you how well a fixture handles water and debris:
- IP44: Splash-resistant. Suitable for covered deck areas with no direct precipitation
- IP65: Jet-spray resistant. Handles rain and snow; good for exposed railings and posts
- IP67: Submersion-resistant. Overkill for deck lighting, but useful for step lighting that might sit in snowmelt
Most deck holiday lighting should be IP65 minimum for exposed locations. Covered soffits or roof overhangs can use IP44-rated fixtures.
Ice Load Considerations
Ontario gets freezing rain. Lights strung along railings or fascia boards collect ice that adds significant weight.
Use fixtures with:
- Rigid mounting clips (not just wire hooks that sag under ice load)
- Sturdy attachment points every 12-18 inches
- Wire gauge heavy enough to support the rated load plus ice accumulation
Flexible rope lights and thin wire strings sag badly under ice. Rigid track lighting or LED strips with aluminum backing hold up better.
Snow Accumulation
If you string lights below railing level or along deck skirting, plan for snow depth. KWC typically sees 30-60 cm of snow accumulation in an average winter, with periodic deeper dumps.
Low-profile lights get buried. If you want visibility through January and February, mount fixtures at least 15-20 cm above typical snow depth in your yard, or stick to railing-top and post-cap positions.
Installation Methods for Deck Lighting
How you attach lights matters for both safety and deck longevity. Poor installation damages railings and creates water intrusion points.
Railing-Mounted Lights
Clip-on systems designed for 2x4 or 2x6 top rails work best. These clips grip the rail without penetrating the wood or composite surface.
Avoid:
- Staples or nails through composite railing caps (creates water intrusion points and voids warranties)
- Cup hooks screwed into wood rails (same issue—each hole is a rot point)
- Wire ties cinched tight around balusters (traps moisture and snow against the baluster)
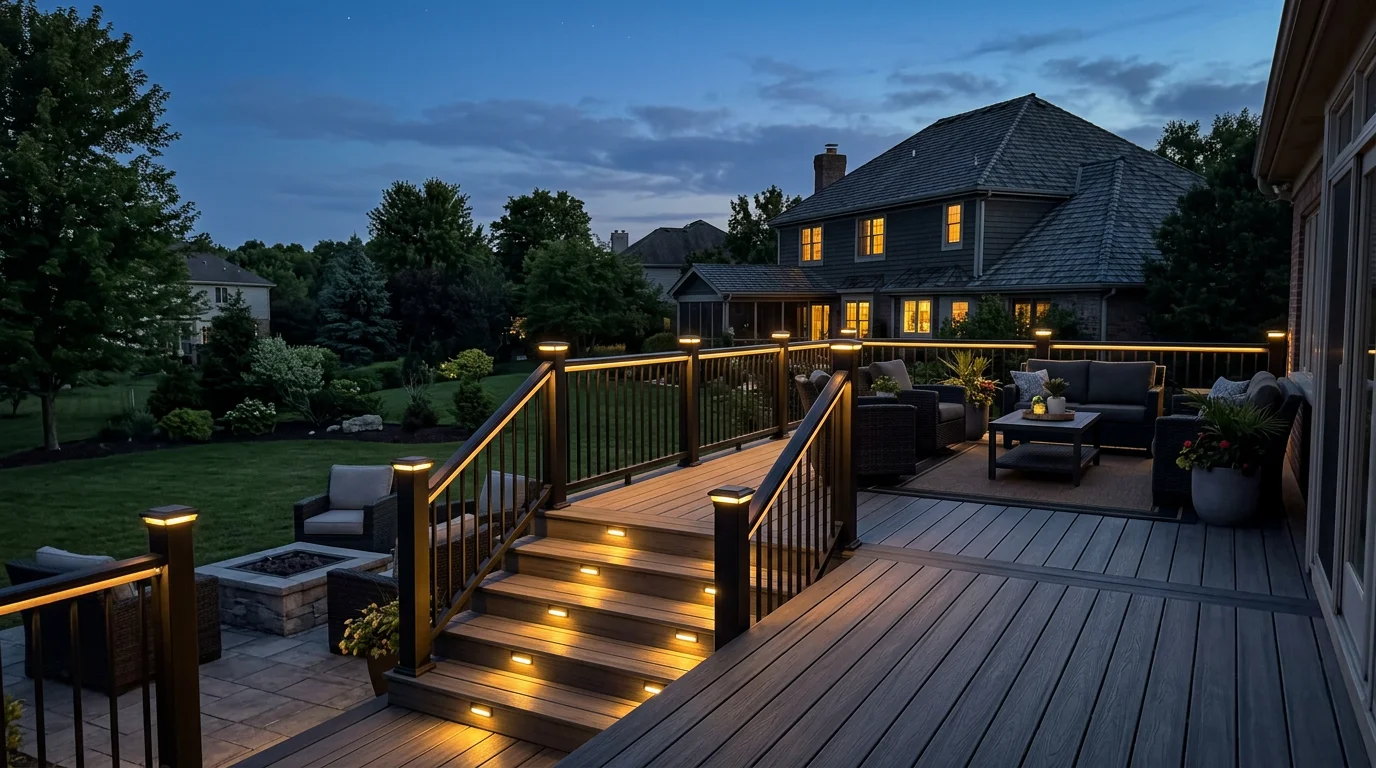
If you're using string lights, run them along the top of the railing cap using dedicated railing clips spaced every 18-24 inches. This keeps wires visible, prevents snagging, and allows snow to shed naturally.
Post-Cap Lights
Post-cap holiday lights are festive and practical. Many low-voltage post caps have built-in sockets that accept holiday light accessories.
If your deck already has low-voltage post lights, check whether the manufacturer offers holiday-specific caps or toppers. Brands like TimberTech, Trex, and Deckorators sell seasonal accessories compatible with their post-light systems.
Cost: $30-80 per post cap with integrated lighting.
Under-Railing Lighting
LED strip lighting mounted to the underside of railing caps creates a subtle glow without exposing fixtures to direct snow and ice.
This works best with aluminum railing systems that have built-in channels for LED strips. Retrofit installations on wood railings require careful weatherproofing at connection points.
Installation tip: Use IP67-rated LED strips and seal all connections with marine-grade heat-shrink tubing. Water intrusion at soldered connections is the most common failure point.
Stairway Lighting
Deck stairs are high-traffic areas where holiday lighting serves both decoration and safety. Ontario Building Code Section 9.8 requires stairway lighting that illuminates treads and risers when natural light is insufficient.
Holiday lights on stair posts or under tread overhangs can satisfy this requirement if they provide adequate illumination (minimum 50 lux at tread level). Most decorative holiday lights don't meet this standard—you'll still need dedicated stair lighting for code compliance.
Mount holiday accent lights on stair post caps or along the stringer on the closed side of the stairs. Avoid running cords across treads where they create tripping hazards.
Lighting Styles and Design Tips
Your deck's material and railing style influence which lighting approaches look best.
Composite and PVC Decking
Composite boards handle cold well, but some early-generation products (pre-2015) become brittle below -20°C. Don't screw mounting hardware into composite boards during cold snaps—wait for a warmer day or predrill holes.
Best lighting styles for composite decks:
- Rope lights or LED strips tucked into railing channels
- Post-cap lights integrated with composite railing systems
- Icicle lights hung from fascia boards (not from composite railing caps)
Wood Decking (Pressure-Treated, Cedar)
Wood expands and contracts with moisture and temperature changes. Mounting hardware should allow slight movement.
Best lighting styles for wood decks:
- Clip-on railing lights that grip but don't penetrate the wood
- Post-mounted lanterns or luminaries
- String lights attached to fascia boards or pergola beams (not deck boards)
Don't screw hooks directly into pressure-treated deck boards or railings unless you're prepared to seal each hole with exterior-grade caulk. Every penetration is a potential rot point.
Aluminum and Glass Railing Systems
Modern cable or glass-panel railings don't offer many attachment points for traditional string lights.
Solutions:
- Post-mounted light strings running between posts
- LED strips mounted to the underside of the aluminum top rail
- Freestanding light posts or luminaries placed at deck perimeter
Glass panels show every water spot and salt residue. If you mount lights where they cast shadows on glass, be prepared to clean panels frequently.
Energy Costs and Bulb Selection
LED holiday lights cost 1/10th as much to operate as incandescent bulbs. Over a 6-week holiday season, the difference is significant.
LED vs. Incandescent Cost Comparison
Assume you run lights 6 hours per night for 45 nights (mid-November through December), with Ontario electricity averaging $0.13/kWh (2026 residential rate).
For a 100-foot string (300 bulbs):
| Bulb Type | Wattage | Seasonal Cost |
|-----------|---------|---------------|
| Incandescent mini-lights | 300W | $10.53 |
| LED mini-lights | 24W | $0.84 |
For a typical deck setup (4-6 strings): you'll save $40-60 per season using LED over incandescent.
Color Temperature
Warm white (2700-3000K) mimics traditional incandescent bulbs and creates a cozy ambiance. This is the most popular choice for residential holiday lighting.
Cool white (4000-5000K) has a bluish tone that evokes winter ice. Works well for modern aluminum or glass railings but can feel stark on wood decks.
Multicolor strings are a personal preference. If you go multicolor, choose sets with consistent brightness across all colors—cheap strings often have dim blues and greens with overly bright reds.
Dimming and Timers
Low-voltage LED systems can usually be dimmed using a compatible transformer. This lets you dial back brightness as the evening progresses or create different moods for parties.
Outdoor-rated timers ($25-50 for digital models) automate on/off cycles. Set lights to turn on at dusk and off at 11 PM or midnight to save energy and extend bulb life.
Common Mistakes to Avoid
Running Cords Under Deck Boards
It's tempting to hide extension cords by threading them between deck boards. Don't. Cords trapped in board gaps get pinched during seasonal expansion, and you can't inspect them for damage without disassembling the deck.
Run cords on top of the deck surface near the house wall, or secure them to the underside of the deck using cable staples (for permanent low-voltage wiring) or hook-and-loop straps (for temporary holiday cords).
Overloading Circuits
Each 15-amp circuit can safely handle 1,440 watts of continuous load. Most outdoor circuits serve other outlets and fixtures, so don't assume you have the full 1,440W available.
Typical loads:
- 100-foot LED light string: 20-25W
- 100-foot incandescent light string: 300W
- Outdoor space heater: 1,500W (usually requires a dedicated circuit)
If you're running multiple light strings plus an outdoor heater or electric grill, check your panel to see what else is on the same circuit. Tripped breakers during holiday parties are no fun.
Ignoring Snow Shedding Paths
Ontario roofs shed snow. If your deck sits below a roofline without gutters or a snow guard system, expect periodic snow slides onto the deck surface.
Don't mount delicate holiday lights directly below roof valleys or edges where snow accumulates. A sudden slide will rip fixtures loose and damage wiring.
Position lighting on deck posts and railings away from roof edges, or install snow guards on the roof above the deck if you plan elaborate holiday displays. For more on managing water around decks, see our drainage guide.
Leaving Lights Up Too Long
UV exposure from spring and summer sun degrades holiday light insulation. Lights left up year-round typically fail by the second or third season.
Take lights down by early February once holiday season ends. Store them indoors in plastic bins—not in an unheated shed where temperature swings cause condensation inside fixtures.
Maintenance and Storage
Mid-Season Checks
Walk your deck lighting every 7-10 days during December and January. Check for:
- Loose clips or sagging wires
- Ice buildup on connections
- Burned-out bulbs (replace immediately—empty sockets allow moisture entry)
- Damaged insulation from cold brittleness or rodent chewing
Replace damaged sections immediately. One compromised wire can short an entire circuit or create a shock hazard.
Post-Season Removal
Wait for a day above freezing to take down lights. Frozen wires and clips are brittle and break easily.
Removal process:
1. Unplug lights and let them warm to ambient temperature
2. Remove clips starting from the far end of the run, working back toward the power source
3. Coil wires loosely (don't create tight kinks that damage conductors)
4. Inspect each string for damage before storing
5. Label any strings that need repair or replacement before next season
Storage Tips
Store holiday lights in clear plastic bins with dividers or separate bags for each string. This prevents tangling and makes next year's setup faster.
Keep bins in a climate-controlled space (basement or interior closet), not an unheated garage or shed. Temperature-cycling causes condensation that corrodes sockets and connections.
Replace any strings that showed flickering, dim sections, or frequent bulb failures during the season. Marginal strings fail early next year.
Combining Holiday and Permanent Deck Lighting
If you already have low-voltage deck lighting installed, you can often tap into the same system for holiday lights.
Most low-voltage transformers have 50-100W of unused capacity during winter when landscape lights are off or reduced. Check your transformer's total wattage rating and calculate how much load your permanent fixtures draw.
Example: A 300W transformer running six 4W post lights (24W total) has 276W available for holiday lighting—enough for 10-12 LED light strings.
Add a dedicated timer or zone for holiday lights so you can control them separately from your year-round lighting. Most low-voltage systems support multiple zones.
For permanent deck lighting that pulls double duty during holidays, consider fixtures with interchangeable lenses or caps. Swap standard clear lenses for red or green colored lenses in December, then switch back to clear in January.
Permits and Inspections
Temporary holiday lighting doesn't require a permit in Kitchener, Waterloo, or Cambridge if you're plugging into existing outdoor outlets.
You DO need a permit if:
- Installing new outdoor outlets or circuits for holiday lights
- Hardwiring permanent fixtures powered by 120V household current
- Adding a subpanel or new breakers to support holiday lighting loads
Low-voltage systems (12V/24V) don't require permits in KWC municipalities as long as they connect to an existing outdoor outlet. If you're adding a new outlet to plug in a low-voltage transformer, that outlet installation needs a permit.
For permit requirements on other deck projects, see our guides on Kitchener, Waterloo, and Cambridge deck permits.
🎨 Not sure which material to pick?
Upload a photo of your backyard and see exactly how Trex, TimberTech, or cedar would look — free and instant.
Common Questions
Can I leave low-voltage holiday lights up all winter?
Yes, if they're rated for outdoor use and you maintain them regularly. LED lights handle cold well and won't degrade from winter weather. The main issue is ice accumulation on wires and fixtures—clear it periodically to prevent damage from weight stress. Most people take holiday-specific lights down by early February, but neutral white accent lighting can stay up through March.
How do I keep snow from covering deck stair lights?
Mount lights on stair post caps or along the inside stringer where snow doesn't accumulate. Avoid mounting lights on stair treads or risers where they'll be buried after the first significant snowfall. If you need tread-level lighting for safety, use recessed fixtures mounted flush with the riser face—these shed snow better than surface-mount fixtures.
What's the best way to hide extension cords on a deck?
Run cords along the deck perimeter near the house wall, secured with outdoor-rated cord clips every 2-3 feet. Use cord covers (plastic channels) if you need to cross high-traffic areas. Never run cords between deck boards or under railings where they're pinched or hidden from inspection. If aesthetics matter, use brown or gray cords that blend with wood or composite decking.
Do holiday lights damage composite decking or railings?
Not if installed correctly. Use clip-on mounting systems that grip railings without screws or nails. Never staple lights to composite boards or screw hooks into composite railing caps—each penetration creates a water intrusion point that voids most manufacturer warranties. Heat from lights isn't an issue with modern LEDs, which generate minimal thermal output.
How many light strings can I safely connect end-to-end?
Most LED strings allow 3-5 strings connected in series before voltage drop affects brightness. Check the product label—it specifies maximum connected strings. Incandescent strings typically max out at 3 strings. If you need longer runs, create separate circuits with their own connections to the power source rather than daisy-chaining beyond the manufacturer's limit.
Upload a backyard photo and preview real decking materials with AI — free, instant, no sign-up.
Permits, costs, material comparisons, and questions to ask before requesting quotes — delivered to your inbox.